GAA's AX84 P1 Rev 10
My first homebrew amp was an AX84 P1. It's a 5 watt, Class A amp with a 12AX7 and a single EL84. The schematic is from the AX84 Project. AX84 is a website for people interested in designing and building do it yourself guitar amps. I highly recommend the website.
I assume you're here because you want to see an AX84 P1 example, so this page describes the construction in some detail and give some tips based on my experience. Note that I used Revision 10 of the schematic.
|
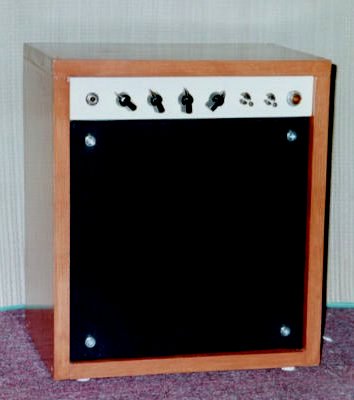
I built the amp as a combo. The chassis is a Hammond 12x8x2 steel chassis spray painted with Antique White enamel paint. From left to right on the front panel you see the input jack, volume, bass, mid, treble, standby switch, power switch and indicator light.
The cabinet is made from 1x10" clear pine. The exterior dimensions are 13-1/2" (w), 14-1/2" (h), 9-1/4" (d). It is stained with Red Maple stain and covered with a glossy polyurethane coating. The glossy stained finish gives the amp a cool, 50's Hi-fi vibe. It's not as durable as a tweed or tolex covered cabinet but one advantage of building your own amp is that it doesn't have to be as durable as a commercially produced amp. You get to trade off practicality for looks. |
Here's a closeup of the underside of the chassis. The rear edge of the chassis is along the top of the picture. From left to right you can see the speaker jack, impedence selector, master volume, pentode/triode switch, tone stack bypass switch, fuse holder and AC jack. Here a description of the modifications I made to the original design.
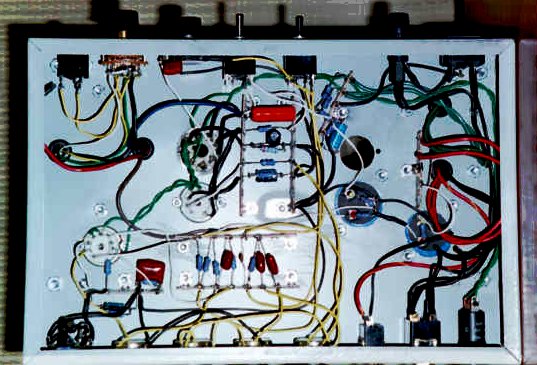
I used LCR 50+50uF/450V caps for the power supply caps. It made construction more difficult since they require a 1-3/16" hole. All of the other holes are 7/8" or smaller which can be handled by a single Unibit stepper drill bit. Axial caps are simpler, easier to find, they don't require mounting clamps and are slightly cheaper.
|
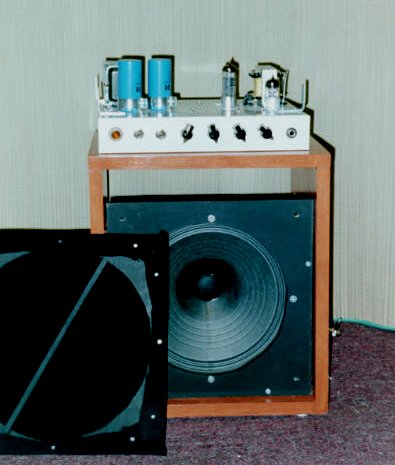
Here is the amp with the chassis out and the speaker grill removed. The angle brackets on the chassis are used to mount the chassis to the cabinet.
The baffle and speaker grill are made from of 1/2" birch plywood painted flat black. Each piece is 12"x12" with a 10" diameter hole for the speaker. The baffle is screwed into 1x1 strips nailed to the cabinet. The grill cloth is black fabric from a yardage store attached to the speaker grill frame with upholstery tacks. The grill cloth is just for looks so the frame has a thin strip of wood across the opening to protect the speaker. I built the cabinet with hand tools. Except for a drill, the only electric tool I used was a saber-saw for cutting the round speaker hole. The corners of the cabinet are simple butt joints held together with wood screws and glue.
Cabinet materials and cost:
|
|
|
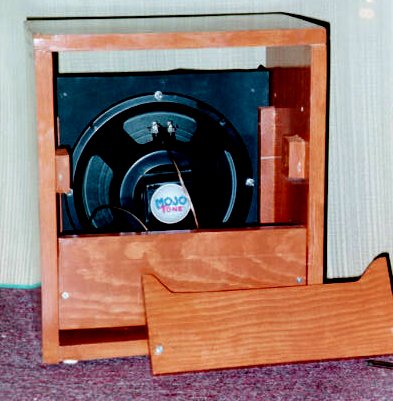
This is the back of the amp. The speaker is a Mojo MP10R 10" Alnico speaker. It sounds pretty good to my ears. You can see the 1x1 strips used to attach the speaker baffle to the cabinet.
Personally I enjoyed building the amp and didn't care as much about building the cabinet. If I had to do it all over again I would use a 16x8x2 chassis and build a bigger cabinet. That would allow me to reuse the cabinet and speaker when I build another, bigger amp. |
Parts And Suppliers
For the common electronics parts I used Mouser Electronics. I used their inexpensive Xicon metal oxide resistors, polyester caps and potentiometers. I got the Hammond chassis and transformers and other guitar amp-specific parts from STF Electronics and Angela Instruments. For the tubes I used Triode Electronics.
Here is a spreadsheet of all of the parts used to build the amp. It includes all of the Rev 10 BOM and the non-BOM items such as a lamp holder, 1/4" plug, speaker, etc. The spreadsheet contains three worksheets - the first is a list of suppliers and prices, the second is a list of parts with their Mouser part numbers, and the third is a list of the major components and prices (in case you were wondering how much the whole thing costs). Note that it is for Rev 10 of the schematic, not the current Rev 11.
Feel free to contact me if you have any questions or comments. My second homebrew amp was a Tweed Princeton clone. It's very similar to the AX84 P1 but it's also different.
Updates
3/2/00 - added links to supplies
2/7/02 - added parts spreadsheet
4/30/06 - moved to new server